Labels

Showing posts with label Around my Home. Show all posts

Friday, January 1, 2016

Kitchen Upgrade

Upgrades: 
Granite- (Color)- White Sand through Home Depot Installed $1800 It was on special buy and they were running a Labor Day promotion for an extra 10% off......SCORE!!! 
Backsplash (Color)- Champagne Toast from Home Depot>>HERE
Microwave- Samsung>> HERE
Knobs->>HERE
Sink->>HERE
Faucet>>HERE
Magnetic Spice Rack>> HERE

We got our granite & sink installed through The Home Depot. We installed the faucet ourselves with the help of a friend. (we had to do some plumbing work because the new sink is much deeper than our previous) The backsplash we installed ourselves! I would not recommend doing it yourself if you do not have experience with tile work or a super handy spouse! If you decide to DIY your backplash I would recommend using THIS to save you time and mess along with premixed grout. We used this brand of grout and it was great> HERE! As far as the microwave goes, thankfully we have a friend in the electrical field who wired us an outlet in the cabinet above the stove and installed our new over the range microwave for us! After that we just switched out some hardware, added spacers to the electrical outlets (HERE) and a little paint (not pictured) and VOILA our updated kitchen!! 


Magnetic Spice Rack

I made this magnetic spice rack for our kitchen for CHEAP! I got the sheet metal from Lowes >> HERE for less than $5 and the spice containers from World Market >> HERE for $1.99/each. We attached it to the cabinet door with sheet metal screws. (Make sure you get small ones so you do not drill completely through your cabinets & also take into consideration the design on the front face of your cabinet when attaching!!) I used a label maker to label all of the tins. This is a super inexpensive project that will free up space in your cabinet, it is very functional and looks pretty impressive too!!


Friday, February 27, 2015

Laundry Room Makeover


Back in November our handed down dryer broke after 8 long years of having to dry loads for MULTIPLE cycles to get them 100% dry (& after multiple attempts to "fix" other issues with it) With that being said, I was actually overly excited at the thought of getting a new dryer that I decided to go ahead and get a matching pair of front loaders! I found this LG set on homedepot.com on a fantastic Black Friday deal that I just could not pass up! Of course this immediately set off the project alarm in my brain! REDO THE LAUNDRY ROOM!!! I mean the washer and dryer had to be taken out of there anyways right?!?! So I ended up updating the look of our laundry room for under $100 and a weekend of work!

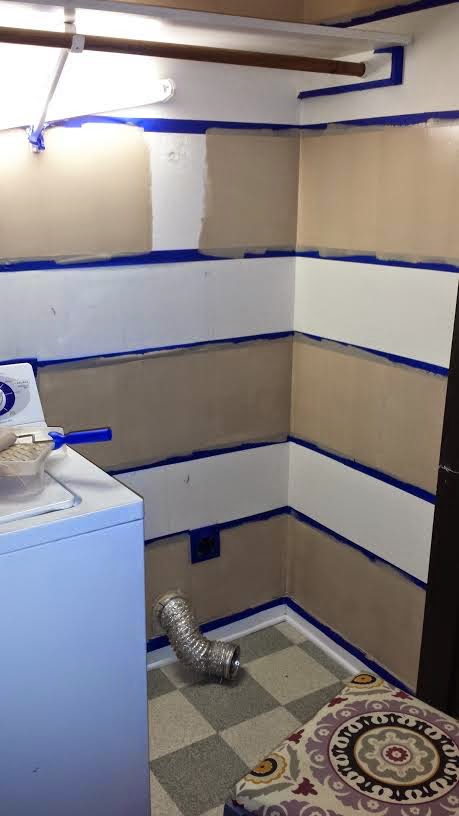
I started by painting the room with stripes. (I read it makes the room look bigger) I just bought the sample size paint containers because I had such a small amount of wall to paint. The lighter color is Valspar Cream Delight and the darker is Valspar Timber Dust.


While my first set of stripes were drying I decided to work on the flooring.
I bought a pack of Styleselections peel and stick tiles for this project. ($26 @ Lowe's)  These tiles were super easy to work with. I cut them using a box cutter. (with ease) I just used the little knowledge I have about tile work and started in the middle of the room working my way out.
Once all the painting and flooring was done I had Home Depot deliver and set up my new babies!! Once they were all installed I added a plywood top board that I stained, which can be used as a folding/ironing counter. I had my local Lowe's cut the plywood to the size that I needed (double check your measurements!!) Then I stained it with the rust-oleum wood stain in Kona pictured below followed by a few coats of matte polyurethane.


After the counter was installed I added some shelves that I had around the house, some canisters I grabbed at TJMaxx for $17, a couple of storage baskets & a trashcan from the Dollar Tree (for lint) and some other things I had around the house to accessorize with!


The project was a complete success! I turned our nonfunctional tiny little laundry room into a workable space with storage! I am much more excited to do laundry now for sure!!!!!

Thursday, May 29, 2014

Tractor Cake


This is a cake I made for my nephews birthday! I was really proud of it and wanted to share!! Every layer on the inside is a different color, since his birthday fell on Easter this year I used mini eggs for what the tractor was pushing! (I found the tractor at Dollar General...it was the perfect size) 

Friday, March 28, 2014

DIY Tile Mirror


This is an easy afternoon project that I did in my guest bathroom. I got the tile for $4.95/sq ft. at Lowes so it is a budget friendly project as well!!!! The following are the items I used to do this project. (for a 33" mirror)

5 square ft. of tile of choice
1 roll of MusselBound tile adhesive tile mat (from Lowes)
Grout (in color of choice)
Puddy knife
Grout Sponge 
Scissors 
Tape and Paper to protect mirror

Step 1: To begin, Windex mirror and make sure it is clean and dry before starting.
Step 2: I wanted my "frame" to be 4 tiles thick so I pre-cut out the strips of tile.

 Step 3: I cut strips of the MusselBound to fit the back of the tile strips and applied them. After that I applied the strip with the tile to the mirror. 
Step 4: Using that same technique to work my way around the mirror. (cutting strips of the tile as needed) And making sure there was no extra netting or adhesive exposed around the edges.
Step 5: Once all of the tile was applied, I taped paper around the edges to protect the mirror from the grout. After that mix the grout according to the directions and apply.

Step 6: Follow the guidelines of the grout for waiting time before wiping with damp sponge. I waited about 20 minutes before I wiped mine. (also some spots I had to go back over with more grout because it was a little patchy! ........Give me a break it was my first time grouting!!!) 

Step 7: After wiping the grout I peeled off the tape and paper and viola!! A new updated look to my guest bathroom!!! (I did a little extra tiling around the side of the countertop as well)


Friday, February 28, 2014

My New Dining Chairs

So a couple of months ago my Grandma gave me her antique pedestal dining table which I refinished in a beautiful weathered gray.  Since then I have been on the hunt for the perfect dining chairs to go with it. I debated between spending hundreds of dollars for a couple of really nice upholstered chairs or being my thrifty self and finding some old chairs to spruce up! Of course I went with the thrift option!!! I just so happened to get extremely lucky and found a nice set of chairs at the 2nd thrift store I went to! (for only $45 for 4 chairs) I only needed 3 but for the price I got them anyway. I used the same technique that I did on the table, with the exception of the darker gray I used on the backs of the chairs! I found this fabric (Waverly-Solar Flair) at my local JoAnn Crafts store (40% off) Score! I also picked up some foam to add a little more cushion to the  chairs. So In the end I spent around $100 for 4 super cute personalized chairs!